
Mizuno Handy Harman sells silver brazing alloys under the well-known brand names EASY-FLO and DIA. Brazing operation with these products in low-temperature is so simple that anyone can easily acquire a skill of brazing.
A tough, ductile, and leak-tight joint is ensured through the standard six steps workflow shown below.
Each of the steps is vital and indispensable. Properly following the steps will ensure quick, economical, and reliable torch brazing.
A tough, ductile, and leak-tight joint is ensured through the standard six steps workflow shown below.
Each of the steps is vital and indispensable. Properly following the steps will ensure quick, economical, and reliable torch brazing.
1.Proper clearances
In brazing, maximum strength in joint is achieved through molten filler metal penetrating into proper clearance.
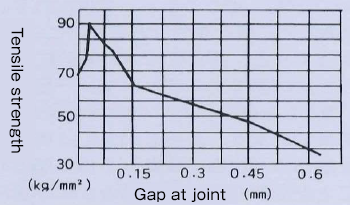
When joining plate-shaped or tubular objects, a clearance of 0.025 to 0.075 mm is sufficient for the molten metal to spread throughout the joint portion due to capillary action.
The graph below shows that in the brazing of steel with silver brazing alloy, a clearance of about 0.04 mm offers the maximum joint strength.
However, it can be seen that almost high strength can be obtained within the range of approximately 0.025 to 0.075 mm.
If these gaps are too narrow, distribution of molten metal will become uneven, while if the gaps are too large, the effect of capillary action will be reduced and the flow of molten metal will stop, decreasing the strength of the joint.
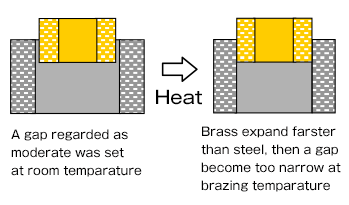
Another point to bear in mind when setting the clearance is differences in coefficients of thermal expansion, particularly when brazing tubular assemblies in which dissimilar metals are joined.
The figure below shows a cross section when a brass pipe is put in a steel sleeve.
In such a case, the gap must be made somewhat large in advance.
On the other hand, when the coefficient of thermal expansion of the inner part is smaller than outer one, it is necessary to make the gap somewhat small size in advance and, the inner part should be inserted through press-fitting in some cases.
When joining plate-shaped or tubular objects, a clearance of 0.025 to 0.075 mm is sufficient for the molten metal to spread throughout the joint portion due to capillary action.
The graph below shows that in the brazing of steel with silver brazing alloy, a clearance of about 0.04 mm offers the maximum joint strength.
However, it can be seen that almost high strength can be obtained within the range of approximately 0.025 to 0.075 mm.
If these gaps are too narrow, distribution of molten metal will become uneven, while if the gaps are too large, the effect of capillary action will be reduced and the flow of molten metal will stop, decreasing the strength of the joint.
Another point to bear in mind when setting the clearance is differences in coefficients of thermal expansion, particularly when brazing tubular assemblies in which dissimilar metals are joined.
The figure below shows a cross section when a brass pipe is put in a steel sleeve.
In such a case, the gap must be made somewhat large in advance.
On the other hand, when the coefficient of thermal expansion of the inner part is smaller than outer one, it is necessary to make the gap somewhat small size in advance and, the inner part should be inserted through press-fitting in some cases.
2.Cleaning the metal
Capillary action functions only when the metal surfaces are clean.
Accordingly, the metal surfaces to be joined must be kept clean.
Remove all rust, oxide film, grease, oil, and other contaminants through chemical or mechanical measures.
Thoroughly remove rust and oxide film using a buff, steel wool, fine-grained file, or other tools. Weak acid, grinders, and diamond powder may also be effective. Grease and oils is removed with high-quality solvents.
When removing rust or oxide film with acid, be sure to remove any grease and oils in advance.
This cleaning needs to be performed immediately before brazing.
3.Application of flux
In general brazing, with few exceptions (e.g., joining copper to copper with copper phosphorous brazing alloy, or furnace brazing in a protective atmosphere), flux is used to prevent oxidation of the metal surface during heating.
Flux dissolves oxides through heating and melting, and assists the flow of molten metal.
Immediately before heating the parts, apply flux evenly to the joint using a brush or other tool. Warming flux to 50-60℃ before applying reduces the surface tension of the flux and improves wetting action on the metal joined.
The amount of flux to apply varies with shape and size of parts, but in general, do not skimp on the flux. If the amount of flux is too small, it will quickly become saturated with the oxides which are dissolved and absorbed during brazing.
This would cause not only the lost of effectiveness, but also difficulties in removal after brazing because its residue becomes so stubborn.
4.Assembly and holding
For capillary action to function well, the parts must be held in correct alignment during heating and cooling cycle.
In practical mass-produced piping system products, a certain degree of precision in alignment (the state of fitting between parts) would be maintained through methods such as crimping, interlocking, swaging, peening, and pinning.
However, when some"play" in the gap cannot be avoided due to the shape of the parts, or when it is not easy to find the "center" for alignment, some fixture is needed to hold the parts together in an appropriate state.
In the design of such fixture, the volume should be as small as possible, and the contact with parts should be kept to a minimum.
Since a cumbersome fixture that contacts the parts broadly will conduct heat away from the joint area, use pin-point or knife-edge design to minimize contact with parts.
Ceramics and stainless steel with low thermal conductivity are among the recommended materials for fixture. The low thermal conductivity minimizes the heat drawn from the brazed parts.
5.Heating
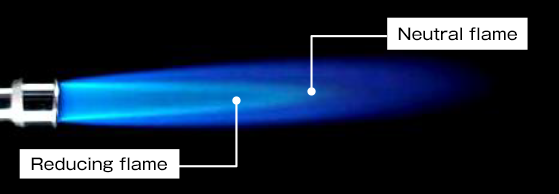
For heating in torch brazing, a temparature of brazed parts needs to become slightly higher than melting point of brazing alloy with a neutral flame or reducing flame.
When brazing parts which weight or volume is different each other, heating should be forcused on the heavy (large) parts.
When brazing parts which thermal conductivity is different each other, the good conductor needs more heating than the poor conductor.
It is important to heat both parts as quickly as possible so that they can reach a brazing temperature at the same time.
The state of the flux and the coloration of the parts can be used as guidance to avoid overheating.
The flux serves as a brazing temperature indicator. The point at which the flux becomes a transparent liquid through heating and the brazed parts takes on dark red color is the time to apply the brazing metal to the parts.
Brazing metal with a low melting point will melt at this point, but those with a higher melting point will require further heating.
Temperature index using Handy-Flux
| Temp. | Appearance of flux |
|---|---|
| 100℃ | Water boils off |
| 315℃ | Flux becomes white and slightly puffy, and starts to flow |
| 425℃ | Flux covers the surface of base metal and has milky appearance |
| 595℃ | Flux becomes completely transparent and more active. Flux looks like water and bright metal surface becomes visible underneath. At this point, check the temperature by touching the brazing metal to base metal. If brazing alloy melts, the parts has reached proper temperature for brazing. |
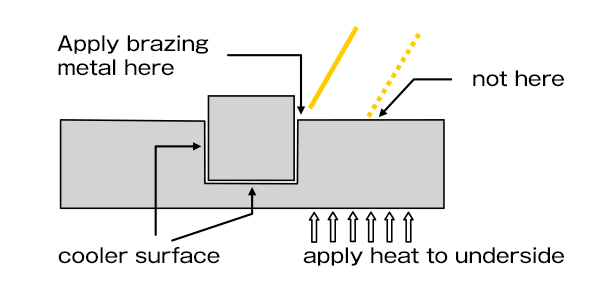
Molten brazing metal immediately penetrates into the joint area by capillary action, but it tend to flow preferentially toward areas of higher temparature.
In heated parts, the outer part surface may be slightly hotter than the inner joint surface.
So particularly when the volume of the outer part is large, it is necessary to apply the brazing metal immediately adjacent to the joint and apply heat to the underside of the outer part as well so that the molten brazing metal doesn't flow toward the area separate from the joint.
6.Removal of flux
Flux residue must be removed after brazing, because flux is chemically corrosive and might possibly cause deterioration of the joint.
Most fluxes are water-soluble and can be removed relatively easily by quinching the assembly in hot water above 50℃.
Effectiveness is enhanced if the assembly are quinched in water while they're still hot after brazing, but it is necessary to make sure that the brazing metal has completely solidified before quinching.
As mentioned in "step 3", when the flux is saturated with oxides, the glassy residue becomes stubborn and difficult to remove.
In such cases, you can remove it with a wire brush or other tool, or tap it with a hammer, and then immerse again in water or hot water.
Effective removal methods include the use of an ultrasonic cleaner and immersion in a warmed aqueous solution of 25% hydrochloric acid for 30 seconds to 2 minutes.
Safety
Effective brazing requires constant attention to ventilation.
This is particularly important when using silver brazing alloy containing cadmium, which emits toxic gases.
When using such silver brazing alloy continuously or for a long period of time, an appropriate ventilation system must be used to remove toxic gases and ensure the safety of workers.
For short work times, wearing masks are recommended unless there is a risk of insufficient oxygen.
When working in tight spaces, use a pressurized air mask.
Always take proper cautions and take notice of maintaining safe work.